
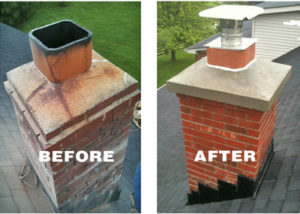
 Before going further to repair a chimney, it is important to prevent any further damage as much as possible. It is advisable that you check thoroughly the whole chimney, including chimney crown as well. Examine is there any damage that you can find and right away and if there is any, it is recommended to fix that first. You might want to check your roof as well can call this roof company.
Then the next thing what you need to do is preparation of chimney mortar. Firstly, you need to prepare the mortar as the main ingredient. Then mix the mortar; and it should be the consistency of cookie dough, not too dry and not soggy.
To begin restoring the brick mortar joints, there is a process commonly known as tuck pointing, which is firstly is prepare the area to ensure good mortar adhesion. Then, apply the mortar to the joint using a pointing trowel, if one is available. Using fingers often work as the best tool for some of the tighter joints, and just make sure the mortar is tightly packed each time it’s applied. Next is clear away excess mortar, making sure it fills the void and stays in place. It is important to continue to keep the mortar churned and at the right consistency throughout the process.
Step to Repair Chimney Mortar
In the restoration and repair of chimney mortar, these are some steps that you need to do.
1. Clean the damaged area
Use a stiff-bristled scrub brush and a mixture of either regular dish soap or commercial brick cleaner and water to scrub the bricks and joints in the area(s) where you will be re-pointing the mortar. Allow the surface to dry completely before moving on to the next step.
2. Remove the damaged mortar from the joint(s)
Focus on the joint or area that you aim to repair. Scrape as much loose mortar out of the joint as possible using a wire brush. Then, chip the remainder of the old mortar out of the joint very gently using a hammer and a chisel. Brush the brick thoroughly with a dry scrub brush to remove any small pieces of mortar and mortar dust.
3. Apply a thin layer of commercial bonding agent
In this phase, you need to apply a thin layer to the exposed surface of the joint(s) that you are repairing.
4. Prepare the mortar
It is advisable that you prepare mortar according to the manufacturer’s instructions as found on the package. Mortar is properly mixed and ready to use when it is moist enough that it holds together without crumbling. Mortar will start to harden or set up, relatively quickly. Mix it in small batches to avoid having it dry out in the middle of the repair.
5. Apply the fresh mortar
Put or apply the fresh mortar to the joint using a trowel, and force it in using a joint strike. Repeat this until the entire joint is packed full of new mortar, and the joint is level with the brick.
6. Finishing
Finish the joint by running a gloved finger along the joint to remove the excess mortar. The mortar line should be slightly indented below the surface of the bricks.