
 Chimneys have two main functions, they create a draft which pulls in the required oxygen for creating combustion and they release the combustion products outside the home’s living area keeping the air inside your home clean and safe to breathe. The draft is created when warm air (or smoke) naturally rises up through the chimney. Generally speaking, taller chimneys create more draft than shorter ones.
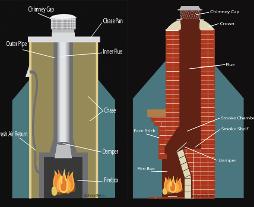
A chimney flue is the opening where smoke passes. Flues for masonry chimneys are typically rectangular or square, whereas metal chimneys are usually round.
Chimneys made out of masonry are generally the heaviest part of the house and are made out of noncombustible materials such as brick, stones or concrete blocks. Therefore, footings require enough strength to hold the chimney’s weight without settling and they need to be placed on well-compacted soil.
In more detail about the masonry of the chimney is as follows. Footings need to extend no less than 6-inches beyond all four edges of the chimney. For single-story homes, the footings need to be 8-inches thick. For two-story homes, the footing needs to be 12-inches thick.
Line masonry chimneys with flue tile-which withstand rapid changes in temperatures and don’t crack-, has a smooth side to make cleaning the chimney easier. It is advisable to use a flue tile that is a minimum of 5/8-inches thick. A gap of 1-inch is required between the outside of the tiled flue and brick surrounding it to reduce any chimney heat loss, which in turn improves draft.
It’s imperative that the masonry chimney has at least a 2-inch space on all four sides between it and any combustible materials, which includes wood framing, ceilings, and the floor. Fill the space with a noncombustible material such as sheet metal. Wall thickness in residential homes for masonry chimneys needs to be a minimum of 4-inches thick.
Before you start building the chimney, make sure for having all basic supplies on hand. Masonry chimney supplies that can be prepared are varied. From bricks, concrete blocks or stone for the structure, cement mortar (a mix of one-part Portland cement, one-part hydrated lime, and six parts builder’s sand is recommended), flashing, precast chimney cap made of concrete or stone, sheet metal and masonry tools such as a masonry trowel and level. It is recommended if you are building the chimney to vent a fireplace, use the same or similar type of brick that matches the fireplace’s hearth.
If you need roof repair service, you can contact https://commercialroofrepairblog.wordpress.com/
Constructions
It is advisable to always work from the ground upward when building the chimney. It usually means you will start the project on top of the fireplace if the chimney’s purpose is venting a fireplace. Before starting, it is vital for making sure that you are building the chimney on a reinforced concrete pad. If this is not available means you will have to lay a pad of concrete 8 to 12 inches thick before you build the chimney, depending on how many stories the house has. Then, mix the mortar with the suggested portions of cement, lime and builders sand. The consistency is right when the mix almost similar with the thickness of peanut butter. Using the masonry trowel, layer each brick with enough mortar that it oozes out between the joints. This guarantees the joints are filled without any air space. Then, the required steps for building the chimney are as follows.
• Lay the brinks on top of each other, building up the chimney’s walls on each side. Occasionally use a level to make sure the brick wall is level both horizontally and vertically. Then adjust whenever necessary before the mortar dries.
• As you are building the outside of the chimney, lay the flue tiles at the same time and use the mortar to seal them together. It makes it difficult to impossible to install them if the chimney becomes too high before you install the flue tiles.
• Install sheet metal on all four sides of the 2-inch opening between the outside of the chimney and the combustible materials, once the chimney is built.
• Install metal flashing where the chimney goes out through the walls. Use the flashing where the chimney and roof meet and as a lining installed under the chimney cap. Seal the flashing using waterproof silicone caulk.
• Install the chimney cap over the top portion of the brick flue housing, making sure it extends past the wall of the chimney by a minimum of 2-inches and isn’t sloped toward the flue but away from the structure. Make sure the cap has an edge that allows water to flow away from the chimney to reduce moisture from coming inside.